Wednesday, January 12, 2011

New artwork, new banner


I decided to make a new banner for Modern Art 4 Kids. You could say I sort of have a prejudice against computer-generated art. Sure, Photoshop and Illustrator and all those programs are fine and dandy and yes, it takes a great deal of skill and talent to create magic with them but....there is something to be said about art that you make with your hands.

I always encourage my children to draw instead of just making something up on the computer. I feel if they cultivate their drawing skills, then it will only add to their technical skill on the computer.

I was working with some paper the other night and so I decided to make my own Modern Art 4 Kids banner out of cut paper--a collage. It was fun. I love that you can still get the tactile sense of the paper cut and glued onto paper. This is what happens when you buy a huge box of scrapbooking squares on clearance at Michael's for $5.99. Yay, me! It's been screaming at me to open it.

The original artwork is fairly small, around 8 X 11. I wanted to make it small enough to fit on my scanner. So, what do you think of it?

Monday, December 27, 2010

Art Workshop: Dissecting a mural

Modern Art 4 Kids recently worked with Today's Urban Renewal Network for their annual Parent's Night Out at Christmastime.

We even got a little mention in our local newspaper, which was really cool.

During this art workshop, we offered two stations: the children could create collages (with glitter pens, which were a huge hit), as well as draw with markers. On the outside patio, Michael offered a paint workshop, which was the second station.

Needless to say, the kids made a beeline for the patio so they could paint with actual spray paint. I have no hard feelings. I don't blame the kids for wanting to experiment with spray paint!

We laid out a large square of canvas material. The children had the opportunity to paint with acrylics and brushes and/or spray paint. This is an activity that requires adequate ventilation as well as face masks. For this particular event, the word "Hope" was drawn on the canvas, so the children could have a starting point. There is nothing more defeating than staring at a blank canvas.

After so many eager hands touched it, the painting took on a life of its own, as all really good art projects tend to do. They added black at the end, to define the shapes and give the piece a finished look. Once the painting was done and it dried, Michael cut it up into large squares. He then stapled each panel onto its own individual frame. Several of the kids who worked on this project from beginning to end were rewarded for their efforts and got to take a painting home. They were extremely proud and happy with their accomplishment.

When you work with middle school aged children and up, you have to be prepared for a certain amount of attitude. Lots of times, they are perfectly happy to bypass whatever it is you have planned to teach them. They would much rather text or talk to their friends. But what I noticed was, the minute some of these kids became invested in their project, their attitude just vanished. They were really into their artwork, they were quiet, at peace, and focused. And that is quite a breakthrough. It also displays the power of art and creative expression in a person's life.


Filling in the canvas with shapes and color.

Painting with aerosol cans is much more challenging than you'd think.

Hope.

Adding the black really defined the shapes.

After the paint dried, Michael cut the canvas into squares. Then they stretched each panel onto its own individual frame. In this pic, they are attaching the canvas to the frame with a staple gun.

The final result. Michael, with several children who participated on this project. They were extremely happy and proud to be a part of this event.

Monday, December 13, 2010

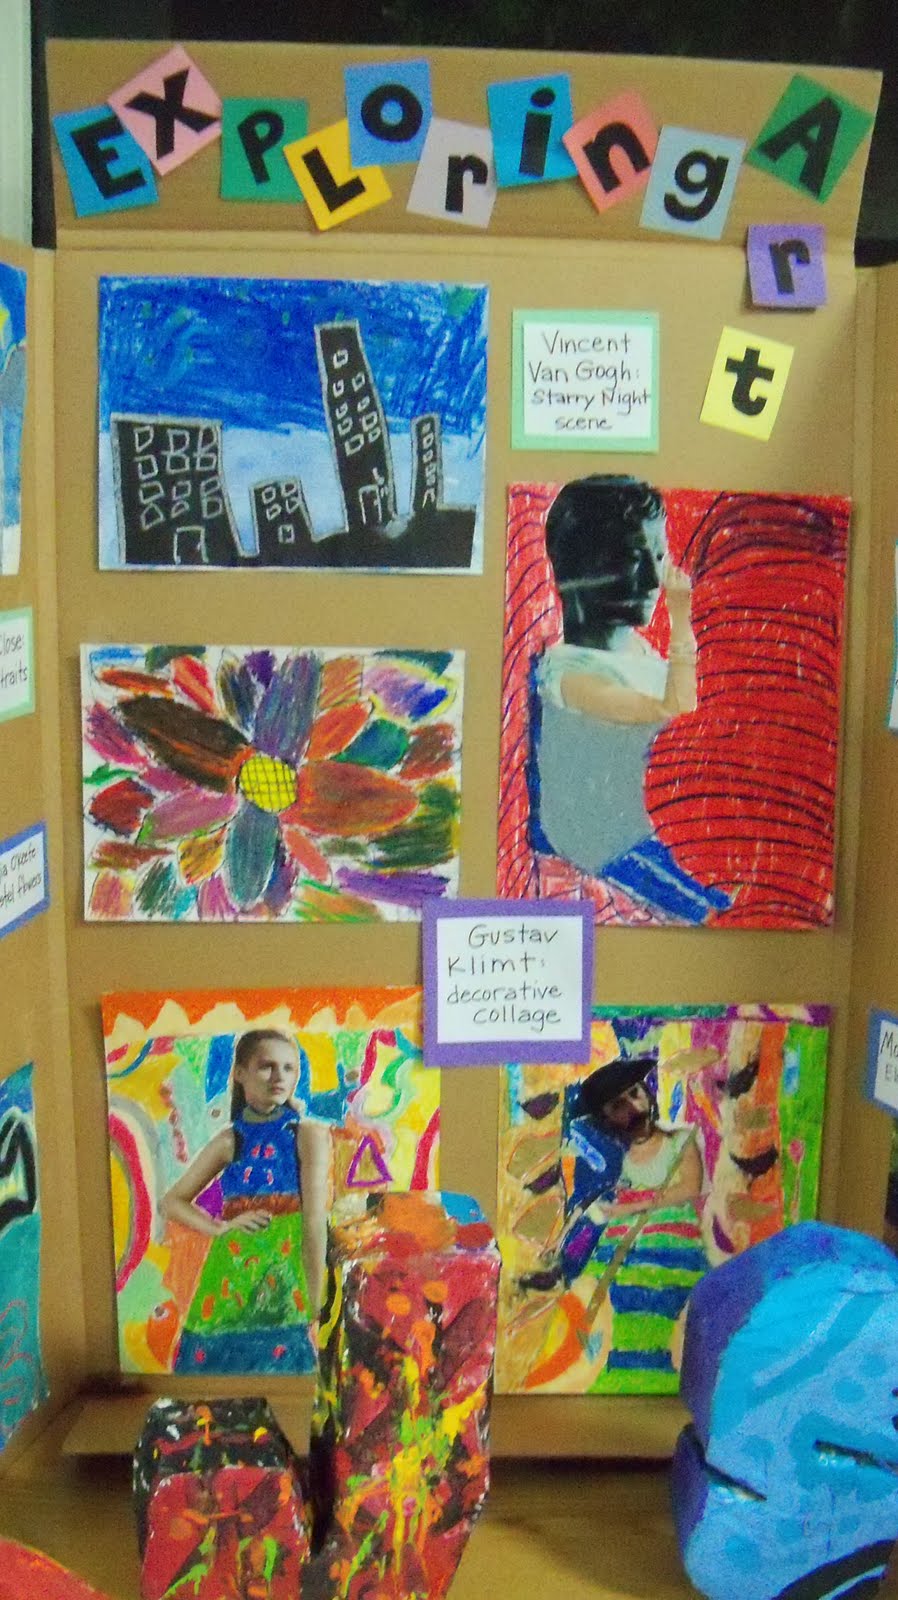
Open House art display

The fall semester at my homeschool co-op is just about over (one more class--wooo hooo!) We've had a great semester thus far. I had a whole new crop of students this time around. I'll admit, not seeing all the little familiar faces that I've grown accustomed to made me a little wistful. But by the end of this semester, I grew to love my entire class. They are an awesome group of little artists. They made my job easy.

Displays are always a challenge because there is always so much stuff. What I decided to do was pare down to the most interesting projects and display those.

Overall, an awesome night and an even more awesome fall semester.

I took the best projects from each lesson we covered. Klimt, O'Keefe, Oldenburg, and Van Gogh were a few of the artists we studied this semester.

My students were also assigned a presentation on their favorite artists. I plan on featuring that really cool cell phone sculpture soon. Also, I totally loved the Bob Ross report. Completely unexpected but so much fun. "Happy little trees..."


My son decided to do his report on Frida Kahlo. Okay, okay, I have to admit I had a little bit of influence on his decision-making, but it turned out really well.

A few of the papier mache letters that took us nearly a month to complete!

Amazing collages, sculptures and drawings.

Brotherly love and fun on open house.

My two sons and budding artists, Sol and Cyan, who took my class this semester.

Sunday, November 14, 2010

Amazing collage video

I am a huge fan of collage. There is something about manipulating paper into whatever you want it to be that is so hugely satisfying. Whenever we do collage projects, I get really into it and I experience a meditative state where my mind stop racing from one topic to another and I can hear all of the sounds around me.

Whenever my kids have projects due for school, my go-to technique is collage. Not only because it is simple and inexpensive, but I have already amassed a large collection of supplies (scissors, #11 x-acto blades, glue sticks, rubber cement, colored paper, magazine cut-outs) so I never have to go out and buy anything. Visually, it is very interesting and makes quite an impact.

I have a huge bin of scrapbooking paper that I can't bear to throw away. Each and every time we make a collage, the scraps just end up being put back in the bin. Added to that are pieces of patterned paper, interesting things I've torn out of magazines, hand-painted paper that I've cut into pieces.

I saw this video recently and it made me wish I'd thought of it first. My kids loved watching it. It is so amazingly creative!

Monday, November 1, 2010

Wax Resist: Batik

I've always wanted to try and create a project that had a batik effect. I love the look of batik, the way little cracks of the wax create a very unique design on the fabric. No two batik designs are the same.

I've learned the actual batik technique back in college, with the hot wax and dye baths. It was so fun and amazing. I still have them floating around my house. I think I wanted to build a career in batik but then reality set in and I figured I really couldn't do much with a degree in batik, you know? Heh.

So I wanted to try something with my students that is way less complicated than hot wax and dyes but would sort of give the same effect, using a wax resist technique.
  • Finding the right kind of paper is key. You don't want to use a thick watercolor paper because when you get to the crumbling step, it will rip and tear in the sharp edges. And you don't want to use a super flimsy piece of paper because it won't stand up to all the oil pastel you will put on it. I settled on some Canson (student grade) watercolor paper. Choose whatever size you'd like. We used a 9 X 12 size sheet due to time issues, but I think a larger size would be more interesting visually.
  • Most students will want to use a pencil to sketch out their design. Just encourage them to use light strokes. I found that drawing organic, natural shapes (round, large and wavy) worked best with the batik technique.
  • Be sure to instruct students to allow space in between each shape. This white part of the paper will mimic the effect of the wax in the traditional technique. It's very important that they leave a space in between their shapes.
  • When the students begin to color in their shapes, make sure they are pressing down with the oil pastel crayon. This will ensure that their colors remain vibrant and true. They should use a variety of colors, but using monochromatic color scheme will look great, too.
  • Once their entire sheet of paper has been filled in and colored, have each student crumble up their paper slowly. Some students will really get into it and crumble it up and abuse the process, but make them do the crumbling softly, or else they will rip their paper.
  • The students should straighten out their crumbled paper. Repeat the process. The goal is make cracks in the oil pastel because this is whats going to give it the wax resist look and feel.
  • Flatten out the piece of paper as best you can. You might want to have your students lay their paper under a heavy book or their heavy school folder for a few minutes while you read them a story about batik.
  • Now they are ready for the next step: watercolor. I used a very light gray watercolor in my example, and for some reason it didn't really show up in the scan of the image. You could use black, which makes for a very dramatic effect. Dark blue works well, too. The watercolor will seep onto the non-colored parts of your design.
  • Lay out your batik-inspired designs to dry.
  • As the watercolor dries, you will begin to notice how the watercolor has seeped into the fine little cracks of oil pastel, creating a really cool batik effect.

I created the design above as an example for my 3rd-6th grade students.

Friday, September 24, 2010

Surrealist Collage

Surrealists liked to paint as if in a dream world. This is why Surrealism doesn't always make sense. Surrealist paintings even create an unsettling feeling with the viewer, much like dreams do. I've always been haunted by such paintings by the artist Giorgio de Chirico, such as The Mystery and Melancholy of a Street.

The thing just gives me the heebie jeebies. Heh.

I wanted to give my students the opportunity to create wacky, Surrealist-inspired collages, minus the haunting, melancholy feeling. These are elementary students, you know. A good way to find images that can be juxtaposed in an interesting way is to use magazine cut-outs. Finally, all the magazines I have laying around my home that I never want to throw out because you just never know when you're gonna need them have been put to good use.

The cut-outs, along with regular pieces of scrapbooking paper gave this project that authentic randomness that is Surrealism. The collages turned out really cool. The students had a blast going through all of the magazine scraps and reinterpreting them in their collage. Oh, one handy tip is to be mindful of the magazine cut-outs that you allow your students to look through. I didn't just toss stacks of magazines in front of them. I went through each mag, tore out what I thought would be great to use and collected a pile that way. InStyle ads are very suggestive, and you don't want to pollute the minds of the very young, now do we?

  • Since you'll be somewhat censoring the ads you are presenting to your class, it'll take you a few days to prepare for this lesson to collect everything you need.
  • Some things I collected were giant pics of food, skateboards, animals, interesting backgrounds, make-up ads, random body parts, etc.
  • Though the students could create a perfectly good collage comprised of all mag cut-outs, offer pieces of multi-colored collage paper as well.
  • I prefer to use good quality glue-sticks when creating a collage. It is just tacky enough to put your images down, but it doesn't make the whole process overly sloppy. I don't recommend Elmer's Glue because the students get carried away with it. Rubber cement is great, as long as the container has a brush inside. It's actually much more archival than a glue stick.
  • The collages can be created on poster board, Bristol board, construction paper, whatever paper you have on hand that is sturdy enough to take the weight of the cut-outs and glue. Also, the size is completely up to you and the time frame you have available. In my 45-50 minute-long class, a 9 X 12 is large enough.
  • Encourage students to be neat with their cutting skills, taking their cuts all the way down to the edge of their images. It just makes the overall appearance that much nicer.
  • The finished collages were so amazing and very humorous! We had a good laugh at some of the random ideas that were generated from this project.
The collage above was created by a 5th grader.

Monday, August 2, 2010

Henri Matisse: Collage

Henri Matisse was a printmaker, a sculptor and most notably a painter from France. Matisse created paintings that were bursting with expression and discordant colors. After an art show in 1905, critics started calling him a "Fauve", which means wild beast in French.

Later in life when his health began to fail, Matisse took to his bed and began to create large-scale collages, which is cut paper on canvas. See the post about Henri Matisse, Painting with Scissors.

I decided to create a project plan inspired by Matisse's Beasts of the Sea. This is a great lesson for the small classroom and the larger classroom alike. It's also a wonderful homeschool activity for the kinesthetic learner. Students really enjoy this hands-on activity!

I can email a printable pdf file with instructions for Matisse's Beasts of the Sea lesson for just $5. Click the “Buy Now” button below to access PayPal for same day delivery.


The artwork above was created by a 7th grader.